Showing posts with label selvedges. Show all posts

Sunday, July 13, 2025

Selvedges

Selvedges  (click on word for all 21 posts written under that label)   


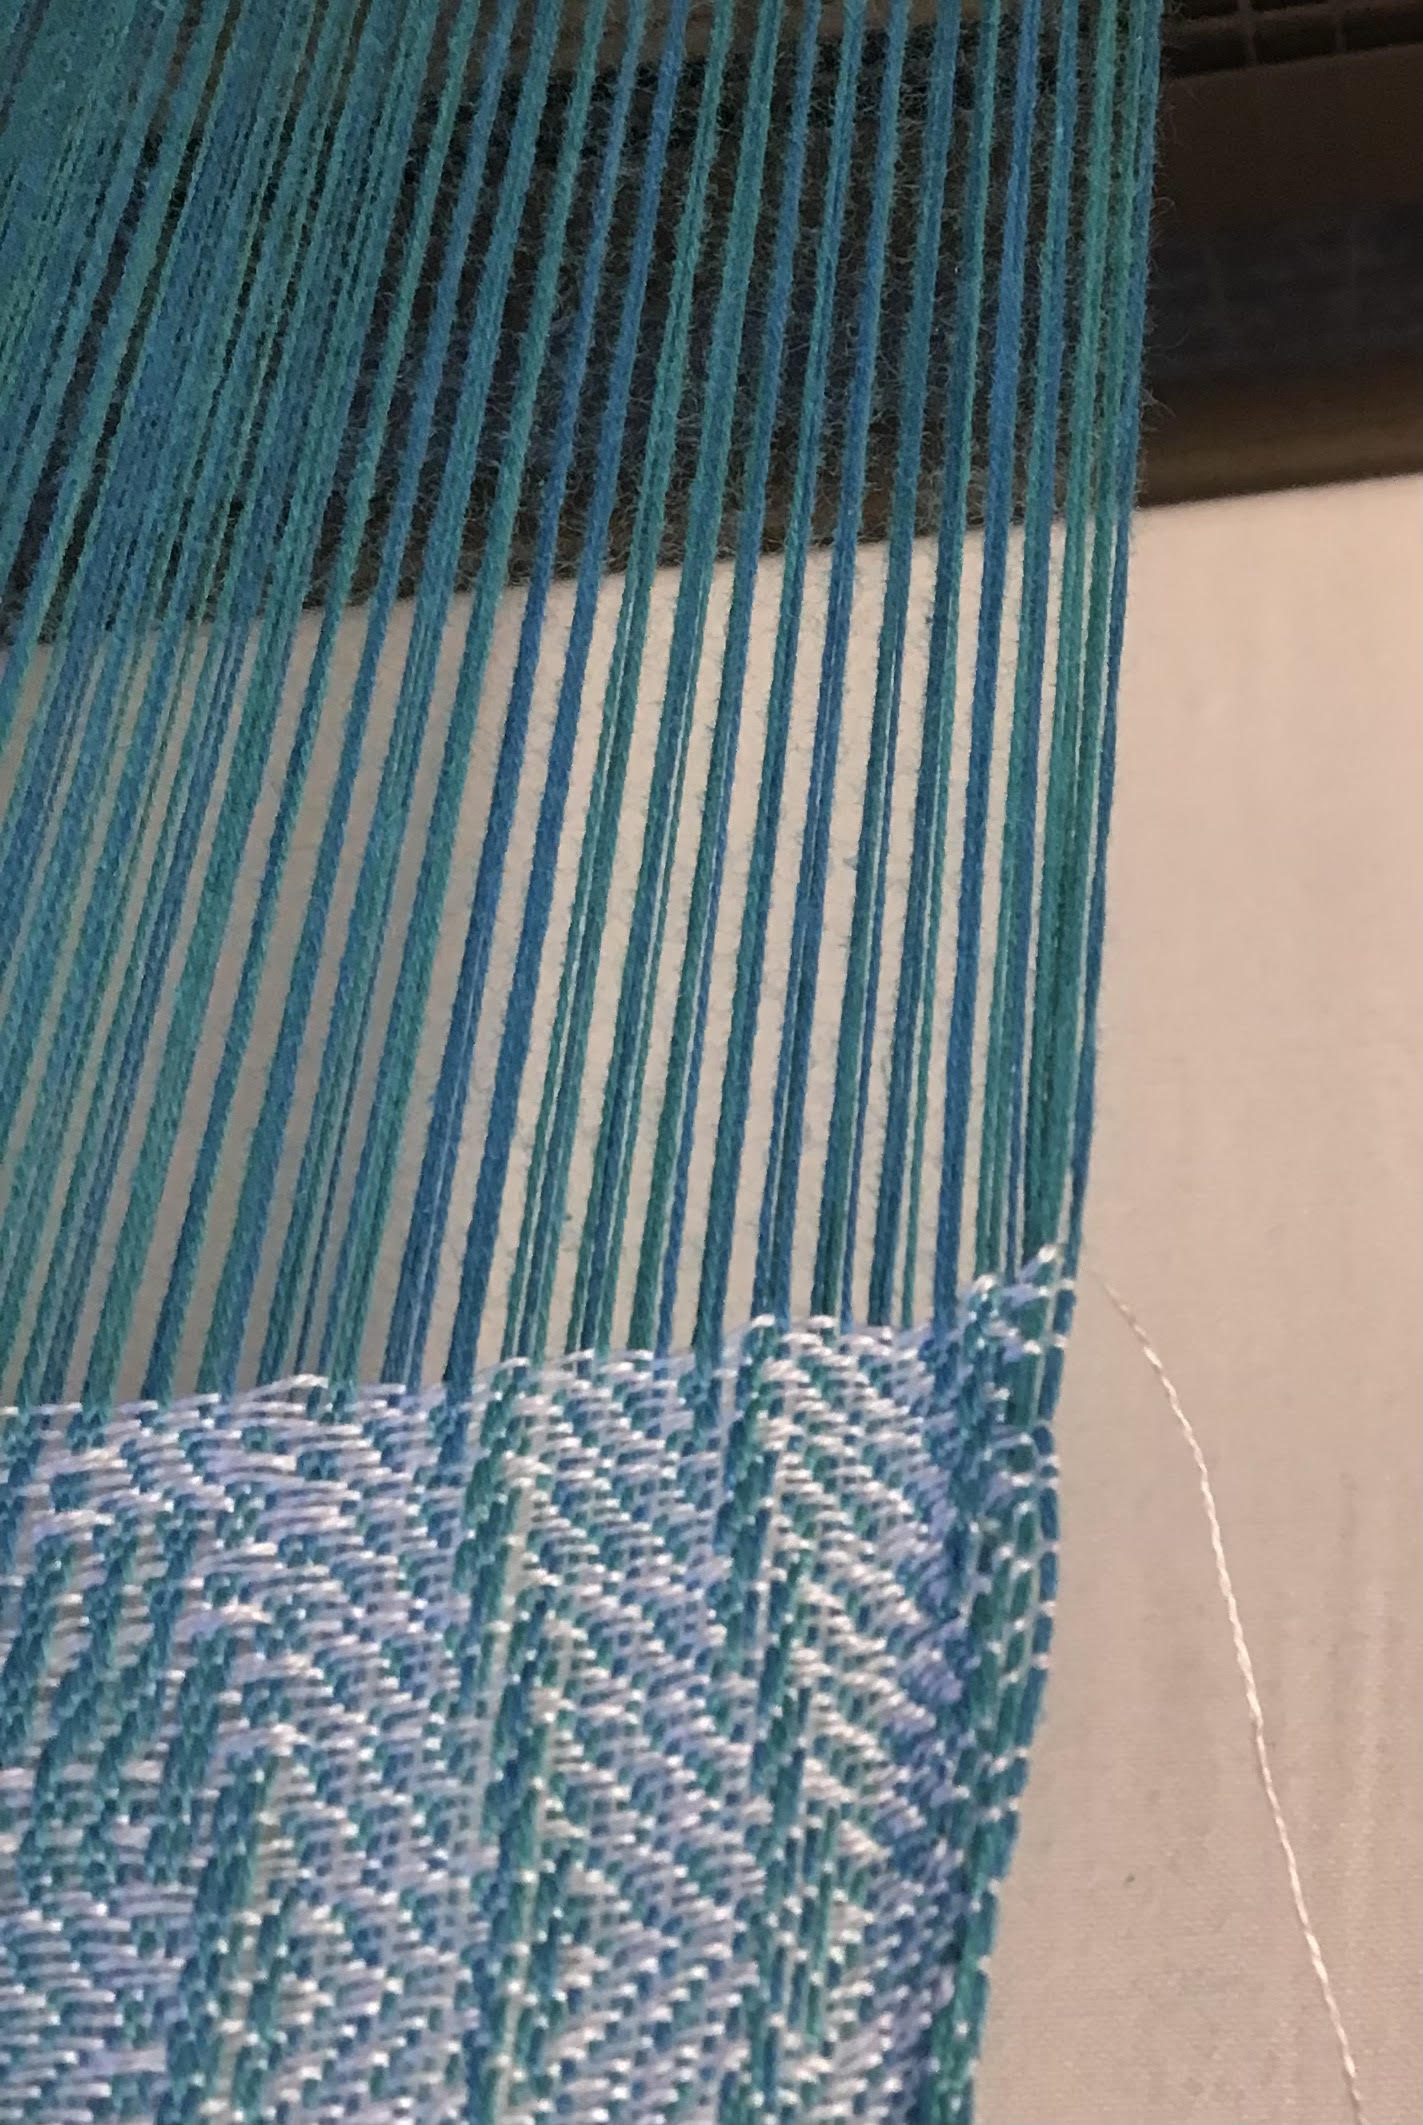
Someone asked about my selvedges in the previous post - it appeared that the selvedge thread was not 'attached' to the cloth well (I paraphrase).

It's true.

I don't always have a selvedge that has a 'firmly attached' selvedge thread.  In the above photo, I do - it's a 2:2 twill, and no, it doesn't have a plain weave selvedge, but a two thread 'float' - because it's a twill and the weave structure has 2 thread floats in it.

I could have left a comment without much of an explanation, but...I'm me, and not much given to short answers.

I have had a lot to say about selvedges over the years.  If I've done it properly, the title of this post is a link to the 21 posts I've written for this blog all by itself (up until this one).  Usually I tend to just address one aspect of a complex topic per blog post, then label them with the subject as in 'selvedges'

I've also discussed selvedges in The Intentional Weaver, and again in Stories from the Matrix, both available from blurb.com

Selvedges are also discussed in my online classes.  And I've certainly said lots on online groups over the years, and had plenty of people tell me I should not talk about what I do because I am doing it 'wrong'.

Plain weave selvedges.  No.  I don't do that.  If a plain weave selvedge is used on a weave structure with fewer interlacements, the selvedges will take up at a different rate.  This can (and in many cases will) cause tension issues at the selvedge.  The selvedge has to be compatible with the weave structure being used.  Or accommodations need to be arranged.

Floating selvedge to create a plain weave thread at the outer edge.  For a number of reasons, no, I don't use them.  *IF* I were to encounter a situation that seemed like it required one, I do know how to do them, and would.  But I've been weaving for 50 years and so far...no.

The point where I change the length of the selvedge thread varies, usually on the fineness of the thread.  The maximum 'float' length I will use is generally in the 5-7 range, have rarely but sometimes have done 9.  It depends on what I'm making, too.  For a tea towel, my 'standards' are less stringent than for, say, a table runner.

Do I have ruler straight selvedges?  Sometimes.


Decided to 'prove' it one day by laying a ruler alongside the selvedge.  The shine off the metal ruler makes it look a bit like the selvedge isn't straight but it is a trick of the light.  

When I'm weaving the large fancy twills, the selvedge may shift, depending on which direction the twill line is running.  


Where the twill line points back into the cloth /\ the cloth can retreat; when the twill points away from the centre of the cloth \/, it can to tend to expand outwards.  It's subtle.

Another thing that happens is that when weaving a 'fancy twill' where the twill structure is not 2:2 but other variations, the cloth with more weft showing than warp will tend to have a selvedge that curls up and in; when more warp than weft is showing, it will tend to curl down and in.

Hard to see this effect in the photo, but it happens.

If you want more detail, check out the other 21 articles I've posted here.  You don't have to agree with me.  You must do what you feel is 'best'.  Having as many different tools/techniques in your toolbox as you can will allow you to pick and choose what is the best way to approach an issue if you aren't happy.  

Sunday, June 2, 2024

WEFT! Right?


selvedges - no that is not a plain weave selvedge

I am pleased to say that the Kickstarter for WEFT seems to be going well and it's looking like we will see a 'new kid on the block' in terms of weaving publications this time next year.  (see yesterday's post for the link.)

It is also good to hear more about the project (I finally watched the promo video on the Kickstarter site) and really wish this magazine had been around in my early days when I was fumbling around trying to figure out how things 'worked' - and what didn't.

It also feels good to know that there are some passionate younger folk willing to take up the reins and try to bring good content to weavers who also want to know how things 'work' - or don't.

Over the past 100 or so years there have been a number of people who have similarly tried to write it all down.  From Margaret Atwater, to Mary Black, to Harriet Tidball to David Xenakis, to Madelyn van der Hoogt - and many others - there has been a consistent effort to keep the knowledge alive and getting it out to those who want to know.

But there is a complicating factor right now - the growth of 'artificial intelligence' and the enshittification of sources of information.

Given I rely on the internet for some of my resources when writing, I was concerned about AI interference in my searches, so this morning I tossed a search term onto Google, then figured out how to filter out their AI responses.  Good!  I don't need to foul my searches with verbal word salad.

However, in the search for the way to do that, I typed in an actual search term, and then took a look at some of the links that were provided (after the AI filtering).  And there was a link to an industry publication that piqued my interest.  Because it was something I had observed, and wondered at.  I'd even been about to do some 'testing' of my own textiles to see if what I had observed made an actual impact in my cloth.

Well, industry had already done that inspection, and their link confirmed my observation - that most draw in happens primarily closer to the selvedges, rather than within the body of the textile.  How much?  I'm pretty sure that depends on the width of the cloth.  I suspect that, the wider the cloth, the larger the area of draw in along the selvedges.

The effect is pronounced enough that some industrial looms now come with separate beams specifically for the selvedges, so that the take up that occurs doesn't interfere with the weaving of the body of the cloth.

Now, in industry, looms typically have roller temples, but even so, draw in happens, enough that industry has made mechanical adjustments to counter the negative effects.

Hand weavers work at a much slower speed than industry, we can make tiny adjustments on the fly.  We don't usually weave 1000 yards before we cut off and re-tie.  

Right now I'm weaving 30" in the reed, about 90" in length per shawl, and I'm only weaving 3 shawls before I stop and cut off and re-tie.  Yes, there are minor tension differences in my cloth, but not enough that I'm overly bothered about them.  I know that I will soon cut off, re-tie and resolve some of those minor tension issues.  So a lot of the issues that industry deals with are so far beyond the scale that handweavers are using that it might seem irrelevant to us.

But for me, reading that link today, confirming my own observations and conclusions felt...affirming.  

And it gives me a much needed boost to continue to explore, dig, analyze and write about what I learn.

I really hope that others are as interested as I am in digging deeper, exploring further, and will support this magazine, which I hope will cater to the best of the nerds in all of us who 'play with string'.

And for anyone who wants to read the post I found, link here


Saturday, April 1, 2023

Under Tension


warp under tension


warp not under tension

Today is April 1, but this is not an April Fools post.

There is a lot of discussion about selvedges in the handweaving community - usually how to get 'perfect' selvedges.  But what IS 'perfect', anyway?

And how do we learn to recognize when something is good enough?  Or not?

These photos are taken on the loom and it is quite clear that my selvedges are not 'perfect'.  It was only after I took these photos and cropped them that I noticed that one pick is tighter than the rest and takes a wee notch out of the edge.  The under tension photo also shows something I mention once in a while (and there is an essay on selvedges that discusses this in greater depth, all in one place), where the 1:3 and 3:1 twill areas cause the cloth to begin to curl up or down, plus the cloth is either pushed outwards or pulled inwards depending on the angle of the twill.

But these photos are to illustrate something more subtle and you may need to click on them to see them 'better'.  As far as the wee 'notch', it will likely become a lot less noticeable after wet finishing and a good hard press.  These towels are already off the loom.

Under tension, the selvedge ends are closer together and, in fact, the selvedges look slightly denser, while in the photo of the warp NOT under tension the selvedge ends tend to relax and push apart from each other.  It is also possible to see, if you look hard, the fact that the doubled warp ends begin to have a 'saw tooth' look to them.  They are not 'smooth' but show the twisting of the doubled ends around each other.  The twist isn't a lot, perhaps one twist per inch.

/
/
/

When the warp is under tension, those twists are much less obvious (well, they are to my eye) because any slack that was in them loose, is now gone due to being tensioned.

The tendency for the threads to move to an area with less resistance is obvious when the tension is released.  When I'm weaving, it's under fairly high tension (because I prefer to do it that way) and when I ease the tension off the warp I can see the web relax and 'grow' widthwise.  When I tension the warp again, the web becomes slightly narrower.  Kind of like how we suck in our gut and stand up straight for a photo, then relax again once the photo has been taken?  

Yarns with lots of texture will be easier to weave when under tension.  When there is less 'slack' in the warp, the weft will beat in more easily and get caught less frequently on the texture of the warp.  It's one reason why I prefer to put textured yarns in the weft, when I can.  But when I can't, I want to make sure I've beamed with good tension (no slack areas in the yarn) and use good warp packing.  

When we put highly textured yarns in the warp we have to remember to adjust for that texture.  One thing to remember is to have a more open density.  A good example of this is brushed mohair.  While the core of the yarn is perhaps quite thin, if it has been brushed before being woven the tendrils of the loose mohair will grab and catch on everything within reach.  A density that would be appropriate for the core yarn will make for difficult weaving as sheds will not be clear, and the finished cloth is going to be very dense.  Sampling is critical, or following the directions of an experienced brushed mohair weaver.  It will look incredibly unstable and unsuitable in the loom, but this is a case where the weaver really has to understand what is happening and make the web so that *after wet finishing* they will get the quality of cloth they want.

I wasn't sure I should post these photos.  Perhaps they are too subtle?  But for people interested in such subtleties, perhaps they are enough to get the concept across...

Thursday, December 22, 2022

Helpful/Not Helpful

 People want to be helpful (usually).  If there is one thing social media has shone a light on, is that people will pass on advice, sometimes even when it isn't asked for.  I have been guilty of this myself, and so I have largely stepped back from posting on social media groups and use this blog instead to air my thoughts and give unsolicited advice, without stepping on any particular individual's toes (or beliefs).

So I thought that from time to time, when I am reminded of 'bad' advice/information being doled out, always with the best intentions, I might address some of these 'myths' here. 

One that I see now and again is in answer to the question of 'bad' selvedges.  Sometimes someone will say that the OP should leave a 45 degree angle on their weft.

The photos below show why that advice isn't helpful:


Not sure what a 45 degree angle looks like?  You can fold a piece of paper on the diagonal, like the post-it note (yellow) in the photo, then lay the straight edge aligned with the fell.  Clearly a 45 degree angle on anything but an extremely narrow warp isn't going to be possible.


The actual angle I leave for the weft is more like 12-15 degrees

That would be the blue line in the photo.

Why 45 degrees?  I have no idea.  None.  Zip.  Nada.

Sometimes I see the justification for a 45 degree angle is that 'you need that much of an angle for the weft to have enough length to take up along the fell'.

Nope.  No you don't.  You just need the leading end of the weft to NOT be trapped in the selvedge.  

Trapping the leading end of the weft in the selvedge means there isn't enough wiggle room for the weft to take the curving path between the warp ends (so to speak).  

And how does the leading end *get* trapped (most often)?  By throwing the shuttle, leaving a nice angle on the weft, then bringing the shuttle hand towards your body as the beater comes forward.

Since the beater starts to obscure the weft as it comes to the fell, weavers don't notice what they have done, and get concerned when their web begins to have excess draw in, leading to abrasion on the selvedge ends, and even, potentially broken selvedges.

So they ask for help, and someone will say 'leave a 45 degree angle on the weft'.  Which clearly is not possible.

Others may advise to 'bubble' the weft, which can help, especially for weft faced rugs, for example, but generally the tendency with bubbling is that too much length is left in the shed and little loops of weft tend to poke up out of the plane of the cloth.

Much better (imho) to learn how to hold, throw and beat so that the weft has free rein to take up as much as it needs without doing all those other things which, in the long run, aren't possible, or helpful.

So *my* advice is to hold the shuttle cradled in your fingers, not over hand.  Use your thumb to control the let off of the weft from the bobbin.  Use your thumb to brake the bobbin and tug gently on the selvedge to seat the weft loop in the selvedge and then, as you bring the beater forward, lift the shuttle hand and let the beater pass under your hand, DON'T BRING THE SHUTTLE HAND TOWARDS YOUR BODY.

Getting good selvedges is a combination of factors, including having the tension on the warp such that you can do the little tug on the selvedge with the weft thread and have the warp ends then return to their proper position when the tension is let off as the beater comes forward.

These processes are subtle and easily overlooked.  To incorporate them into your practice you will have to be mindful and focused on them until they become your new default.

Thank you for coming to my TED talk...


Tuesday, June 7, 2022

Selvedges

 The bugaboo of so many weavers - their selvedges.


2:2 twill


16 shaft 1:3-3:1 twill


16 shaft fancy twill

New weavers will often times get tangled up in the fact that their selvedges are not 'perfect'.  They hear that there *must* be a plain weave interlacement at the selvedge or it's 'wrong'.  Or that there cannot be any draw in.  Or you have to pluck your selvedges (and then wonder why the selvedges break).  Or you can't possibly get good selvedges if you don't have a floating selvedge.  Or use a temple.  Etc.

Sometimes people will ask on a group how to get 'perfect' selvedges.

Sometimes I'd like to just point them to the thousands of words I have already written on the subject.  Because just like with everything about weaving, the reason why selvedges are 'bad' depends.

There are multiple reasons for selvedges to be 'bad'.  And new weavers who don't understand this want a magic potion solution.  There isn't one.

Getting 'good' selvedges doesn't depend on one answer because there are multiple causes.

Sometimes it's the yarn.  An elastic yarn will behave very differently from an inelastic one.  What process does the person use?  How consistent are they in applying it?  Do they understand the role of tension in warp preparation?  Or in the weaving of their cloth?

So if they don't give an example of how their selvedges are 'wrong' there isn't much I can say other than play 20 questions with them.  Or point them to my previous writing.  Or my bookOr my on line classes.

So, to new weavers who are having issues with 'bad' selvedges?  Pay attention to what you are doing.  Then, one by one, try different solutions.  Perhaps the warp was beamed with too little tension.  Or you are weaving with too little tension on the warp.  Or too much.  Or too much draw in.  Or not enough.

Or, or, or...the list does go on.

Sometimes the solution to 'bad' selvedges is in dressing the loom in the first place.  So it doesn't matter what you do while you are weaving.  You have to FIX THE PROBLEM THAT IS CAUSING THE ISSUE in order to get different results.  Applying 'bandaid' solutions won't always work because the problem happened before you started throwing the shuttle.  Sometimes it is the throwing of the shuttle.  And on and on.

If you don't want to pay someone for their expertise there are plenty of weavers who have written extensively about this issue - because it keeps being a problem.  I've linked some of my blog posts on selvedges in the first sentence of this post.  You can read what I've written here for free.

But each person must do the work of figuring out what is happening, then changing what they are doing to solve the problem.

A lot like life, honestly.

(Other 'experts' you might like to pay attention to:  Jane Stafford, Janet Dawson, Jette van der Meiden - spelling may not be correct, sorry), Peggy Ostercamp.  Each of us has unique experiences and may have different solutions to try.  Because we weave different things and have different perspectives.  Above all keep trying.)


Wednesday, May 18, 2022

To Float or Not to Float


Mug rug woven in rep weave with plain weave hems (unhemmed)


This is a sample of warp rep.  It was designed for a workshop topic where students would weave 'mug rugs' in weave structures and yarns suitable for table.  As a 'mug rug' or coaster, they still got a usable textile at the end (if they wanted one) but could quickly explore a variety of options.

One of the things that some people insist on as being 'essential' is floating selvedges.  By and large they are not particularly essential if you understand how to 'lock' the two different wefts at the selvedge.

So this little sample did not come with floating selvedges because I never use them.  Instead I would show the participants that they simply had to watch what was happening to the threads and then twist the two shuttles around each other to keep the pattern weft weaving right to the edge of the cloth.  As the blocks changed, sometimes you would twist the shuttles one way, then the other.  But it didn't take long to begin to see the pattern and just accommodate the sequence and keep things going.

Some people would insist you HAD to have a floating selvedge.  I told them to add one if it was important to them, but in point of fact it wasn't necessary for this (or most other two shuttle) weave(s).

Some two shuttle weaves are more consistent and the twisting remains the same throughout.  Some structures like warp rep change as the block sequence changes.   But it was pretty obvious that I needed to change the direction of the twist of the shuttles.  And then it remained the same for the duration of that block.

If someone prefers floating selvedges, then they should use them.  But they are not 'essential' to the weaving - unless the weaver wants to use them.  Nor is a plain weave selvedge 'essential'.  But that's another post, for another day (or check out what I've already written on selvedges.)

Wednesday, April 27, 2022

Not Up to the Challenge


When weaving 1:3 twill blocks, sometimes the selvedge doesn't want to weave in nicely.  For this warp, I doubled the four outside ends in the heddle (keeping them the same density as the rest of the cloth in the reed) but the pulling of the warp combined with the weave structure means that the selvedge ends tend to not want to pull in nicely to the body of the cloth and I'm left with 'loopy' selvedges.

This is NOT perfect.  Or ideal.  Or even acceptable if I were planning on entering them into a juried exhibit.  

But I'm not.  I'm just weaving up my yarn stash and trying to get it done as quickly as possible.  I don't have the spoons for fussing about it and frankly?  These loops really aren't going to much affect the function of a tea towel.  They might (might!) wear out more quickly, but should still give good service for several years.

I happen to like weaving twill blocks for the crisp motifs.  The 1:3 twill is easy to weave since fewer shafts rise than sink, therefore it takes less physical effort.  One down side is the selvedges tend to curl.  Where there is more weft than warp in the block the cloth will curl up.  Where there is more warp than weft in the block, the cloth will tend to curl down.  Much like the knitting.  If one side is all knit and the other all purl, the knitted cloth will curl to the purl side.

Wet finishing reduces that curling - in both knitting and weaving.  Unfortunately it doesn't always solve the 'problem' in it's entirety.

I do notice how much the wet finishing tends to camouflage minor inconsistencies, though, and so it is with these towels.  The high value contrast shows up my inconsistent beat, but after wet finishing and a good hard press, the minor 'streaks' are not jumping out at me.

So, here's to imperfection.  In spite of minor bobbles, these towels will still dry dishes.  I have another 3 or so kilos of this teal/turquoise yarn.  I may switch to a fancy twill for a while so that I'm not reminded so obviously that I'm *still* not perfect.

"Let go your perfect offering.  There is a crack in everything.  That's how the light gets in."

Leonard Cohen

Thanks for the reminder Leonard.   

Wednesday, February 9, 2022

Reed Marks


tiny black ^ shows an obvious reed mark


I get asked by newer weavers how to get rid of reed marks.  

I don't actually worry about them over much.  Remember that we don't judge our textiles while they are on the loom, but after wet finishing.

Here is the warp I'm currently weaving.  There are some areas where the reed marks are really obvious.  The thing is, when I talk about threads moving to areas of least resistance?  This kind of gap is what I'm talking about.  Once the warp has been cut off the loom and tension removed from the threads?  The ones next to a gap are going to tend to roll into those gaps.  Even *before* the web goes into the water.

So once wet finished, the cloth is going to have reduced the size of the reed marks by shifting into those gaps and either be gone entirely, or greatly reduced.

Whatever is left I don't worry about.  They are the mark of the loom.   (Well, the reed to be precise, but you get my drift!)

Likewise I don't fret too much about floats at the selvedge.  So long as the float doesn't interfere with the function of the cloth, I pretty much ignore them.  These towels have 5 end floats.  And they will be fine after wet finishing, which will include a hard press.

But if someone truly wants to eliminate all reed marks, a finer reed can be used.  For this warp I have 4 ends per dent.  A higher density will disguise reed marks, but these are meant to be tea towels and I don't want them really dense - I want them to get into tiny corners and be able to dry the dishes.

Plus the denser the cloth, the more it will resist absorbing water.

So - understand what will happen when something changes and work to create the quality of textile you want to have when you are done.  Yes, including the wet finishing.  Reserve judgement until it's done, done.


Monday, March 8, 2021

Those Pesky Selvedges (and what to do about them)


Selvedges.  The bane of most weaver's existence.  Or at least their weaving practice.

So much emphasis on achieving 'perfect' selvedges.  So many ways they can go wrong.  Yes, even for me, if I'm not paying attention.  Or get lazy.

Mostly my selvedges are pretty straight.


On these plain weave scarves above, the selvedge is about as straight as a ruler, as they say.


This one?  Well in fact while the web was in the loom, the selvedge was as straight as the textile in the photo above.  BUT!  The weave structure was such that after wet finishing little scallops formed along the length of the cloth.  Did I fuss about that?  No.  No, I did not.  I had formed the selvedge straight in the loom but the dynamics of physics entered the scene during wet finishing, allowing the threads to move to areas of least resistance and the result was this little, consistent, scallop along the edges.

As I dig deep into the principles of the craft I find myself connecting the dots in a conscious way, instead of the mostly subconscious way I have adopted over the years.  Mostly I learn through the process of observation and analysis.  When I do this, that results.  It is only now that I am attempting to pass my knowledge on to others that I need to begin to take that knowledge out of my observed experience in order to let people know what is happening in order for them to also learn from their observed experience.

By understanding the physics, the *science* involved in the creation of textiles, they can then work out the best way for them to approach the learning of the craft.

I am hoping one of my students will write up their journey in acquiring knowledge, and if they do, it will be a guest post here.  (If anyone wants to do a guest post, email me laura at laurafry dot com.)

So, back to the first photo.  I'm weaving on a 2/8 cotton warp at 20 epi.  The wefts are a 2/8 cotton for the hems, because that is overall thinner than the body weft which is a cotton flake.  The 'notch' in the cloth occurred as I was changing from hem to body while I also advanced the warp.

Why the notch?  Was it my shuttle handling?  Not really.  Did I leave too shallow an angle on the weft?  Nope (and that's not the issue most people think it is).  Was the beam poorly wound?  Not at all.  Was I beating on the 'wrong' shed? (open/closed/closing)  No, I was doing everything as I usually do.  

So what happened?  I had not tightened the warp as much as I should have when I advanced the warp.  Then when I slightly tugged the weft to seat it around the selvedge, the slack in the warp allowed the warp ends to be pulled in too much.  I didn't notice until after I'd woven several more picks, then tightened the warp.  Just a wee bit - one or two notches.

When I had the correct amount of tension on the warp I could have unwoven the picks and settled the warp ends back where they belonged but I've done this before and I know that by the time I wet finish the cloth, hem it and give it a final hard press, that notch will be barely noticeable.

So I took the lazy way out.  I left it.  Once I've done the finishing I will see if I can find it again and post a comparison photo.

There are times when we know that a 'mistake' isn't that big a deal and won't affect the function of the cloth.  Then we need to decide how much effort we will put into making 'perfect' cloth.  And sometimes we need to know when good is good enough.  Now, if I was planning on entering something into a juried exhibition, or weaving for archival purposes, or as an heirloom, obviously my choices will be different than if I am weaving a humble tea towel, meant to be used daily.  That little notch won't affect the function of the towel in any way.  It won't even shorten the lifespan of the cloth.  

So I left it.


Saturday, January 18, 2020

The Scissor Solution


Since weaving was, first and foremost, my business/profession, I was very quick to realize that my time was the most valuable commodity that I was investing into my textiles.  As such, it became quite easy over the years to figure out when the time I needed to invest in a warp was becoming unreasonable.  When I needed to invest so much time that I could not ever hope to recoup the time and materials I had put into completing it and bringing it to market.

It is one reason I sample so much.  I'd rather invest a little (a little time, a little materials) to prove that a concept is going to work.

Over the years I have invested a great deal of time in just making samples to investigate new weave structures and new yarns.  While I am happy to take advice from other weavers as to density, the only way to know for sure if that is going to work for me is...weave a sample.

Sometimes the sample is a warp of its very own.  Sometimes the sample might be the header at the beginning of the warp.  Sometimes a sample woven on a narrow warp won't translate to a warp that is much wider, so that last chance header sample is necessary before committing to the entire wide/long warp.

Sometimes conditions change.  Having a different loom means that what I did before on the AVL might not translate well to the Megado, which has a different kind of engineering and a much lighter beater.

Sometimes you start a warp with a certain relative humidity and by the end, that may have changed drastically.  As happened on this silk warp.

The first scarf wove up beautifully.  Then Life Happened and it was about five days before I got back to the warp.  Not realizing the delay would be that long, I had not released the tension on the warp (20/2 silk).  I knew the relative humidity would drop, but in the end wound up having to turn the small humidifier off because the house windows were beginning to ice up, quite significantly.  And the warp sat for those days with the tension on and the relative humidity dropping like a stone.  (This morning it was registering at 18% in the house according to the little weather station we have - and that was with the humidifier back on since yesterday morning.)

When I started weaving yesterday afternoon, I noticed the right hand selvedge was not behaving well.  Loops were forming at the edge and to make the weft sit 'properly' I was having to stop and give the weft yarn a slight tug to make it lay properly.

That cut my weaving speed further, but mostly?  It was annoying.  I carried on until the third broken end happened, in the space of 12" woven.

I was happy enough with the way the cloth was building in the loom, but I looked at the selvedge.  Considered how many more  broken ends I might have to deal with, took a break and thought about whether or not I really wanted to carry on.  Or if it would just be a really good idea to stop now.  Before I invested any more time or weft yarn in this scarf.

The first scarf looked to be good, and that was the one intended for publication.  It was a matter of quite literally cutting my losses.

The yarn was 'inherited' so my financial investment wasn't great (shipping to get it here).  I had not carefully selected each and every skein with a lovely vision of what it would turn into - I was working from someone else's stash.  (Don't get me wrong - I have done this before and I consider it a great honour, it's just that I don't have the same sort of emotional attachment to it.)

The warp was six meters.  When I cut the warp off the loom, it looks like I do have a lovely scarf to write up and submit.  I'm very pleased with how it looks prior to wet finishing, and I think a good hard press will bring the silk to the lovely lustre we associate with silk and I will be happy to submit it for consideration.  Out of a six meter long warp I have apparently achieved one scarf that meets requirements.

The thrums (about 2.75 ounces) will go to a friend who takes them and incorporates them into her 'art' yarn, so the yarns won't actually be 'wasted'.  I just won't be spending any more of my time trying to make it behave when it so clearly does not want to.

So I applied the Scissor Solution.  And I feel fine about it.  The next warp is already planned (mostly) and I am looking forward to getting that into the loom and enjoying weaving it off.

Saturday, October 7, 2017

Culmination


I'm at the fun bit of weaving - sitting at the loom, contentedly weaving away, piling up the yards/meters.  Thinking.  Because when everything is going well and you only need surface attention for the task at hand, the mind can go wandering.

This morning I was thinking about how cyclic in nature being a professional weaver is.  My year end is not Dec. 31 but oh, around now.  The craft fair season begins very shortly and if I haven't got it ready for sale by now?  It probably isn't going to be ready for this year.  So what I am actually doing is working on inventory for next year.  

I am also stash busting - to a certain extent.  While the weft I'm currently using is 'new' - as in purchased in Sweden at Va:v last month, the warp yarns have been in my stash for considerably longer.  

This summer I did not have my usual 'birthday' sale so I am thinking of getting new items loaded to my Circle Craft shop as soon as I get home from the Circle Craft Christmas Market, mid-November.  Maybe by then these towels will be finished.  Or very soon after I get home.  My 'shop' is currently closed due to my travel schedule, but I haven't forgotten about it.

There are a whole bunch of things that have had to be put on the back burner, but I have not forgotten about them.  Number one is, of course, The Book.  I got the last set of edits in June but have just not had the time - or energy - to deal with them.  Again, hopefully after the craft fair season.  Doing the new edits can actually be - not relaxing, exactly - but a different kind of activity, one particularly suited to winter.

Plus the perennial conversation about all things weaving, generally process related, goes around again.  So finishing The Book seems particularly important, if only to give people more information than is generally available.  If you don't know what you don't know, you don't know that you need to know it.  My hope is to fill in some of those cracks in people's fundamental knowledge so that they can make appropriate choices.

As for the web on the loom, yes there are reed marks.  No they may not come out 'in the wash' (wet finishing) but they are consistent and therefore part of the character of the cloth.  I'm good with it either way.

And yes, that's a three thread float on the selvedge.  And no, it doesn't bother me.  It's fine.  And no, I don't use a floating selvedge.  See my other blog posts on Selvedges.  Whole lot more to good selvedges than using a floating selvedge.  Or an end feed shuttle.  Etc.

Monday, August 7, 2017

Self edge


Selvedges.  So many opinions.

In order to get 'perfect' selvedges you must use a floating selvedge.

In order to get 'perfect' selvedges all you need is an end feed (or delivery) shuttle.

In order to get 'perfect' selvedges you must have a plain weave interlacement, regardless of the weave structure of the body of the cloth.

Well, those things are all well and good if they actually address the issue of the 'poor' results.

There are so many ways selvedges can go wrong.

Beaming.  In my experience a warp weaves off much more nicely if it is beamed under tension - at least as much tension as will be applied during weaving.

Warp packing.  In my experience warp packing should be firm enough to prevent threads from upper layers from cutting down into lower layers.

In my experience warp packing should be several inches wider than the warp to prevent ends from sliding off the warp packing and causing issues with different length/tension from the rest of the warp.

In my experience tensioning the warp as consistently as possible makes for better selvedges and body of the cloth than being wildly inconsistent.

Shuttle handling.  In my experience I get more control over the weft pick by holding the shuttle cradled in my fingers, not gripped from above.

So in the above photo, the edge of the beige is, in fact, the selvedge.  The weft is a reasonably smooth yarn, so all in all, it makes a nice tidy consistent selvedge.  But I get pretty much the same result with a 2:2 twill selvedge.


And no, I don't worry about a 2 thread float.  I don't even particularly worry about a 3, 4, or 5 end float.


The above photo is 1:3-3:1 twill blocks.  No the selvedges aren't ruler straight, but the cloth is 2/16 cotton for the warp and weft as 32 epi, 32 ppi.  The length of float isn't a problem.  To me.  Your mileage may vary...

Currently reading Martha Grimes Vertigo 42

Tuesday, July 26, 2016

Pro Tip


These warps were wound with one strand of Bambu 7 and one of a highly textured yarn.  I wound them both at once, with my index finger between them.  I find that winding them separated by a finger means they don't grab onto each other and snag during beaming.  

When I thread, I choose the yarns randomly as they present themselves, except at the selvedge.  Since the weave structure is plain weave, I manipulate the threads so that I have two Bambu 7 forming the selvedge.  This gives a nice tidy edge to the scarf.  

Monday, September 2, 2013

To Float or Not


I am constantly seeing the advice on the chat groups that you must have a plain weave interlacement at the selvedge and if you don't as in the advancing twill above, you must use a floating selvedge in order to achieve good selvedges.

Well, you can if you want to, but personally, I don't like weaving with floating selvedges.  I learned how to weave without them, never saw the need for them (except in 3 or 4 very specialized instances) and never use them.

Some people need the security of using a floating selvedge.  Some don't.  My message, take it for what it's worth, is that you do not have to use them if you don't want to.

Learn how to beam your warp with good consistent tension, then learn how to wind a bobbin with good tension and evenly wound - no hills or valleys - then learn how to hold and throw your shuttle so that the weft feeds off without snags and jerks.

The above silk cloth (out of the washer/dryer but not yet pressed) was woven with an advancing twill treadling which means that there are no plain weave interlacements at the selvedge.

Choose your expert, then decide for yourself what you need to do to achieve the quality of cloth you desire.

Monday, August 5, 2013

Monday Rambles


When I published Magic in the Water, I realized I would need to attend fibre events in order to show people the book in order to sell it.  Since having just one item to sell wasn't going to pay the expenses of renting a booth space never mind travelling to get to the event, I decided to sell yarns as well.  I tried very hard to stock yarns that other vendors did not carry.  Which worked, sort of.  I wound up importing yarns that I thought were special and nice to weave with in hopes that others would be attracted to them, too.

In order to make my yarns even more different, I stocked a lot of hand dyed yarns, some dyed by others, some dyed by myself.


This yarn is one of the ones I imported and dyed myself.  It is a 2/20 silk, quite nice, dip dyed variegated.

After going through not one but two major (and not a few minor) health issues, I decided that now I was in my 60's I needed to stop doing so many things.  It was taking up far too much time, space and budget to order in cases of yarn, skein it off, dye it, attach labels, store it and then schlep it across the country in hopes people would buy.

So for the past week Doug has been turning these skeins into coned yarn.  Because in order to weave with it, it needs to be taken out of skein form into something more efficient.


This is the 3rd bucket he is starting to fill and there are enough skeins for at least two more.  That's a lot of silk scarves coming up!

And once gain the issue of selvedges has raised it's head on one of the chat groups.  If you want to know my thoughts on selvedges click on the label to the right hand side.

But here are a few shots of some of my textiles and their selvedges.  All of them are some sort of twill and none of them have been woven with a floating selvedge or an end feed/delivery shuttle.


It is not necessary to use a floating selvedge to get a 'good' selvedge.  As I've posted before selvedges are not that simple.  While some people may find that they get better results with them than without them, they are not 'necessary'.

As always, if you use them and like them, carry on.  If like me you don't, try to find out why your selvedges are not good and then fix that problem (or problems).

Sunday, July 21, 2013

Selvedge Subtlety


 cloth winding onto cloth beam in a spiral


Sticks inserted to provide support for the cloth

The painted warps are 10.5 meters long, yielding 4 scarves.  Apparently I did a sloppy job somewhere along the line getting this one into the loom.

A) the reed slipped sideways as the warp was winding onto the warp beam
B) I tied the warp off centre at the beginning
C) Both of the above

With the cloth winding onto the cloth beam in a spiral the right selvedge is hanging free over nothing but air.  This means the cloth is curving downwards because there is nothing to support it and the right selvedge is beginning to loosen.  (Could not show this in a photo.)

There are two things that can be done to fix this problem.

A)  Cut off what has already been woven and re-tie.

B)  Insert sticks to provide a solid foundation for the cloth to wind onto.

Since I am half way through scarf #3 cutting off is not an option, so I simply inserted sticks as I continued to roll onwards.

There are two other situations where inserting sticks or cutting off are required.  (Which is why I cringe when the immediate answer to the question of poor selvedges is 'use an end feed shuttle'.  An end feed shuttle will do nothing to correct poor selvedges in the above and the following instances.)

A)  The weaver has been weaving a twill weave structure and then switches to plain weave.  Since plain weave does not draw in as much as twill, the selvedges will be hanging over open air and eventually both selvedges will loosen.

B)  The weaver changes to a thicker weft.  Again the cloth will not draw in as much as previously and both selvedges will hang over open air.

When I am switching weave structures and/or thickness of weft, I try to weave the wider cloth first.  But if that isn't possible, inserting sticks will often times do the trick.

Currently reading The Bride Box by Michael Pearce


Saturday, February 18, 2012

Selvedges Are Over Rated?

So this is what my right hand selvedge looks like on this fabric.  You can clearly see the pale green weft being carried up the selvedge and weft tails hanging out.

Does this bother me?  As I said in my previous post, the selvedges are going to be cut away in the end, so no, they don't bother me in the slightest.

For many years I wove yardage for a fashion designer who cut the fabric to sew her garments.  Did she care about the selvedges?  No.  What she cared about was that I wove the cloth as quickly as possible so that the cloth would cost as little as possible.  Since the time a weaver puts into the weaving is the largest part of the investment in hand woven cloth, every little time saving process I could institute was more money in her pocket at the end of the day.

I think that hand weavers get obsessed about selvedges because by and large most weavers do not cut up their fabric so their selvedges are there for all and sundry to see, not just themselves.  Selvedges are therefore an integral part of their cloth and so they want them to look 'perfect'.

As I've posted before, getting good selvedges is not a one-tip-fixes-all kind of thing.  There are several factors that play into getting good selvedges.

1.  Beam the warp under consistent tension using good packing materials.  Make sure the warp is cylindrical, not cigar shaped.  If the tension is too loose and packing material is not used, upper layers can cut down into lower layers causing all kinds of havoc during weaving resulting in poor weaving tension, not just at the selvedges, but within the body of the cloth.

2.  Try to be consistent about using the correct amount of tension for the yarn being used.  Too loose and selvedges will draw in, usually inconsistently.  Too tight and selvedge ends may break.

3.  Do not weave too close too the beater/reed.  As the fell approaches the reed the angle the warp threads open at becomes more acute putting stress on the threads and usually results in either broken threads or loops at the selvedge.

4.  Wind your bobbins well.  So many weavers have never heard of winding a bobbin by building up a 'hill' at one flange, then running the weft over to the other flange and building up a hill there, and only then filling in the valley between.   If this is not done the bobbin will jam in the shuttle cavity causing pulls at the selvedge and even broken selvedge threads from the repeated stress of the jams.

5.  Leave a good angle and ensure that the weft is not 'locked' into the opposite selvedge - make sure the weft is loose in the shed when beating to ensure the weft can take up and not cause excessive draw in.

6.  Be consistent advancing and tensioning the warp.  (See #2 above)

7.  Be consistent in beating.

Review my video clips on You Tube for bobbin winding and shuttle throwing/handling.
Laura's You Tube Channel
Currently reading Ian Rankin's latest - realized I'm running out of time before I leave so I'm going to read the two books I'm most interested in.  The others can be taken out of the library when I'm home again.

Tuesday, December 27, 2011

Selvedges

3 thread 'float' on selvedge 2/8 Tencel warp/weft 24 epi

3 and 5 thread 'floats' on selvedge 2/20 cotton warp with 2/16 cotton weft 32 epi/ppi.  The 3/1-1/3 twill causes small 'scallops' at the edges.

3 and 5 thread floats on selvedge 2/20 cotton warp with mystery weft 36 epi/ppi


None of these textiles were woven with a floating selvedge or temple.  In my experience - depending on yarn size - a 3 or even 5 thread float at the selvedge is not a problem.
Rather than worry about a textile having a plain weave selvedge I would far rather see weavers focusing on being consistent.  Learning how to hold and throw their shuttles well.  Learning how to advance and re-tension their warps.  Learning how to beam their warps so that they go on under consistent tension.  Learning how to wet finish their cloth. Learning fibre characteristics so that they can make appropriate choices for their textiles.  Learning at least enough theory to make changes to the project notes found in publications - or recognize when there is a mistake in the printed format.

But none of that is necessary if the weaver is enjoying what they are doing and are happy with their results.  If they aren't, then perhaps they need to dig a little deeper and learn more....

Speaking of which, there are now 7 students enrolled in the John C. Campbell Folk School class in March.  I'll take up to 12.  It also looks like the workshop in Durham is a go with a few more empty spots.  Not sure about Sarasota or Asheville.

Currently reading The Midsummer Crown by Kate Sedley

Friday, May 6, 2011

'Weak' Selvedges

Click diagram to biggify so you can read it more easily....

I've mentioned a couple of times that the yarn I'm working with is really a knitting yarn - it's very softly twisted and therefore wasn't standing up very well as warp, tending to shred in the reed at the selvedges.

The way I deal with this sort of issue is to thread the selvedges to compensate for this inherent weakness.  Since I'm weaving plain weave, I double the ends in the outside two heddles, but keep the density the same in the reed.  When I'm weaving a twill, I thread the outside four ends doubled in the heddles and again, keep the density the same in the reed.

If you double the density in the reed as well as the heddle, the fabric is twice as dense there and will tend to not beat in at the same rate as the rest of the cloth creating a 'smiley' fell line.  It will also look different than the rest of the cloth.

I also do this for very fine threads that are a bit on the weaker side.  It really doesn't show and makes life soooo much easier when you don't have to deal with shredded selvedge threads!

Saturday, November 20, 2010

Results


a fan of scarves showing my selvedges....click on the image for an enlargement


People quite often exclaim over the straightness of my selvedges. They want to know my secret, or assume that I must have some trick up my sleeve for getting ruler straight selvedges (most of the time, depending {there's that word again} on weave structure and yarn).

The secret to getting straight selvedges is no secret at all. Or at least, I've not kept how I do what I do a secret. I've been active on the internet since 1994 (anyone remember bulletin boards and usenet groups?) telling people what I do and how I do it. (Check the labels here or my You Tube channel for video clips.)

The 'secret' to getting good selvedges is learning the physical skills that need to be utilized and using 'good' tools/processes.

What those tools are will depend on the individual - their physical size, their personal hand/eye co-ordination, their equipment.

But to gain proficiency at something like weaving or any other skilled craft, the practioner must understand the essential theory behind what they are doing, be analytical about how they are doing it, and practice, practice, practice with a self-awareness of what they are doing, gauging the success of their results and tweaking their processes, sometimes changing their tools for ones that will work better for them.

Instead they rely on what I call 'magical thinking' - if I use this trick or this tool I will magically get good selveges without my having to do anything else.

Getting good selvedges requires a succession of steps, any one of which if not done well, will lead to poor selvedges.

First you must beam the warp well and under tension. The longer and wider your warps, the more crucial this step becomes. If your warp is 'cigar-shaped' on the back beam, you will have problems with your selvedges. (Unless you build that shape properly so that the outside threads don't slide off causing them to be shorter than the middle ends.)

A short narrow warp simply doesn't have the length and breadth to show poor beaming techniques because it's all too soon done. So a weaver who has consistently woven short (less than 5 yards) and/or narrow (less than 15 inches wide) warps who decides to put on a longer/wider warp will suddenly run into problems that s/he has never experienced before and cannot figure out what went wrong. They've been weaving for years and never had the problem before, after all!

A weaver should know how to hold and throw the shuttle efficiently. I know, I know, many people aren't interested in being efficient. What these people don't realize is that holding and throwing the shuttle efficiently simply means that you are doing this process in a way that will lead to good selvedges and a good consistent beat. In other words, they will get a better quality cloth.

Some people don't even know that there is an efficient way of holding and throwing the shuttle. I so often see shuttles being thrown (or should I say shoved) 'backwards' or even upside down. When I mention this to the weaver I generally get a blank look and a response of "I didn't know there was a 'right' way to hold the shuttle."

Again, if the weaver is only weaving on a narrow warp, how s/he holds the shuttle doesn't matter as much as when they try to weave a wider warp.

I watched a sheep to shawl demo one time where the weaver held the shuttle 'overhand' which meant she could not get the shuttle from one selvedge to the other as it could only travel 3/4's of the way across the web which meant that she was reaching into the shed to retrieve it. The net result of this? The handspun alpaca warp was stretching at the selvedge and I could see that the selvedge was starting to pull apart from the repeated stretching and abrasion due to fishing the shuttle out of each shed.

Over and over again I read/hear people being advised to leave sufficient slack on the weft. This is absolutely true - as far as it goes.

But over and over again I see weavers leave a nice lovely angle on their weft pick and then as they beat they pull the hand holding their shuttle towards their body which effectively shortens the weft pick and results in excessive draw in. And they get frustrated because they don't realize what they are doing and continue to do the same thing. Or they make longer and longer 'bubbles' in their weft which results in loops forming at the selvedge which in turn results in loose selveges ends and then..........poor selvedges.

Since I have begun having private students come to learn how to weave I have been delighted that they all appear to be 'natural' weavers achieving good selvedges on their very first sampler. It occured to me during a recent bout of insomnia that perhaps in addition to being naturally adept they are also benefitting from my tutoring. They are learning from the get-go how I hold and throw the shuttle and they are very quickly achieving selvedges that are generally consistent and pretty straight right away.

Ultimately if a weaver is happy with their results there is no need for them to change what they are doing. If they are not happy with their results, perhaps a good analytical look at how other weavers achieve their results will get them closer to the results they desire.

For a complete look at what I do and how I do it, CD Weaver III pretty much sums up everything I do except for how I now sley the reed. Since I've posted extensively on that technique (learned from Syne Mitchell who learned it from Peggy Ostercamp) I don't feel the need to upgrade the cd for that technique.

My advice? Get Peggy's new book and look at how she does what she does. Or buy CD Weaver III and try out a few of the things I do and see how they sit with you.

Christmas is coming - ask Santa for either of these resources and be open to trying something different if you aren't happy with your results.

(CD Weaver III is $60 on my website - if you order before Dec. 6 I'll include the sample packet set for free - this combination is $75.00 plus shipping on my Art Fire store.)